


For many centuries, flowers have been popular painting subjects, not only because of their beauty but also for the life they bring.
In today’s blog post, we’ll take a quick look at the basics of doing watercolour flowers, looking more closely at the structure of a flower and how to bring out the best in terms of shape, tone, and colour.
Flower Anatomy

There are a few hundred thousand different species of flowers that come in many different shapes, colours, and sizes, but for most flowers, they can be separated into 3 different parts: the petal(s), the pistil, and the stem.
Tip: For the best studying experience, draw or paint while looking at a real flower. I also recommend studying one flower at a time before moving to do more elaborate flower clusters, arrangements, or bouquets.
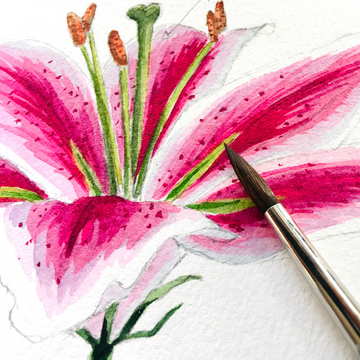
The Petals

The petals are the most obvious part of any flower, and probably the most diverse in terms of looks. Kind of like the “clothing” of flowers, they are used for various reasons, often to attract bugs to help pollination or as protection for the central part (i.e. the pistil).
Some flowers have just one single petal, while others have enough to form a large pompom, but in general, you want to keep petals looking light and elegant.
Paint in layers as petals form in layers, and most of the time, the darkest part will be near the centre to give the illusion of depth.
Just remember to observe your flower carefully – first, the overall shape the petals make, and then how those individual petals form that shape.
Larger petals tend to curve or fold over themselves, so make sure to observe how they look before drawing the connecting shapes!
This applies to leaves too, so do your best to get the right “feel” for this.
If you’re painting a flower that has a ton of tiny petals, you often don’t have to worry about painting each individual one.
Just get a general texture and sprinkle some individual petals here and there, adding more prominent shadows towards the underside.
The Pistil

The pistil is the fancy botanical term for the inner part of the flower, where the petals surround for protection.
It’s where a flower is fertilised and turns into fruit afterwards. This part can also look different depending on the flower, but for the most part, it’s like a long stem protruding from the centre of the flower.
Some flowers also have long anthers, where you can see the powdery pollen ready to be carried away by bugs or the wind.
Others, like sunflowers, may have a completely different make-up, but usually, you’ll have a centre or core part of the flower surrounded by petals.
Also, this part may or may not be visible depending on the angle and type of flower, so take that into account while sketching or painting.
The Stem

The arguably easiest part to draw is the flower’s stem. You might need to add thorns and/or leaves, but usually, it’s a straight line with a slight curve caused by the weight of the flower.
Again, depending on the angle and amount of flowers, you may not even see the stem, but it’s good practice to understand how the curve of a stem affects the direction and angle of the flower.
There might also be sepals (i.e. the green leafy bits found at a flower’s base), so make sure to include the parts you can see! It’s the details that will help form a cohesive flower whether you’re drawing from real life or from your imagination.
Piecing it All Together

The final step is to combine everything together, starting from the central part of the flower, then gradually adding in the petals and other details you see.
In terms of the dimensional shape, most flowers tend to form a cup, fan, or ball-like shape, with the petals curving around the pistil.

For flowers that have a gradation of at least 2 different colours, you can get that gradation by adding paint while the paper is still wet from the previous colour (so the colours bleed into each other).
If the flower has more refined details like stripes or spots, make sure to wait until the paper is dry before layering these details on top.
That’s pretty much the basics on how to do watercolour flowers! Of course, you could tweak your methods depending on your style, but thankfully flowers are very forgiving subjects.
This means as long as you have petals of any sort blooming from one focal point, your painting will look like a flower.
As for flower arrangements, the stems will have a bigger part to play, as they will direct where each flower will go.
Just keep in mind that arrangements look best when they look natural, especially for flowers. There is certain randomness found in nature, and this “feeling” is best grasped by looking at the real thing!
Searching for reference photos will also help, but ultimately, it all comes down to observation, consistent study, and even more practice.
Regardless, have fun discovering and exploring the wide world of flowers! They’re sure to brighten up any corner, and any moment of the day.
Do you have a preference for certain flowers or floral arrangements? What’s your go-to style for floral paintings? Share with us in the comments below!