

It’s like a magic trick – an illusion that makes it difficult for the eye to follow. While this is true for reflections, especially warped ones (like on a car or watery surface), it’s true for materials like glass as well.
During my journey as an artist, painting glass objects had me stumped for a bit because the light and shadows would seem to change each time I blinked.
Plus, it was difficult to put a solid line on something I could barely see, let alone add colour to something that doesn’t usually have any colour!
So in today’s blog post, I want to help demystify this tricky material and give you some tips on painting something difficult to see.
A Glass Half-Full

Watercolour is a transparent medium by nature. It makes sense that painting transparent objects would make the process easier. But let’s start with the basics first – how to draw a glass object.
Side note: I’m just going to quickly mention that flat glass objects (e.g. windows) are the easiest to draw, as you can treat them either like a reflective object; or as if they aren’t there at all (depending on the lighting).
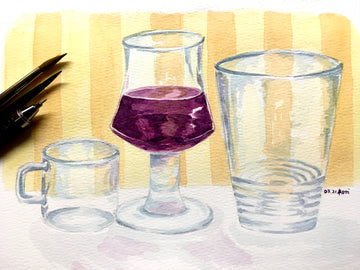
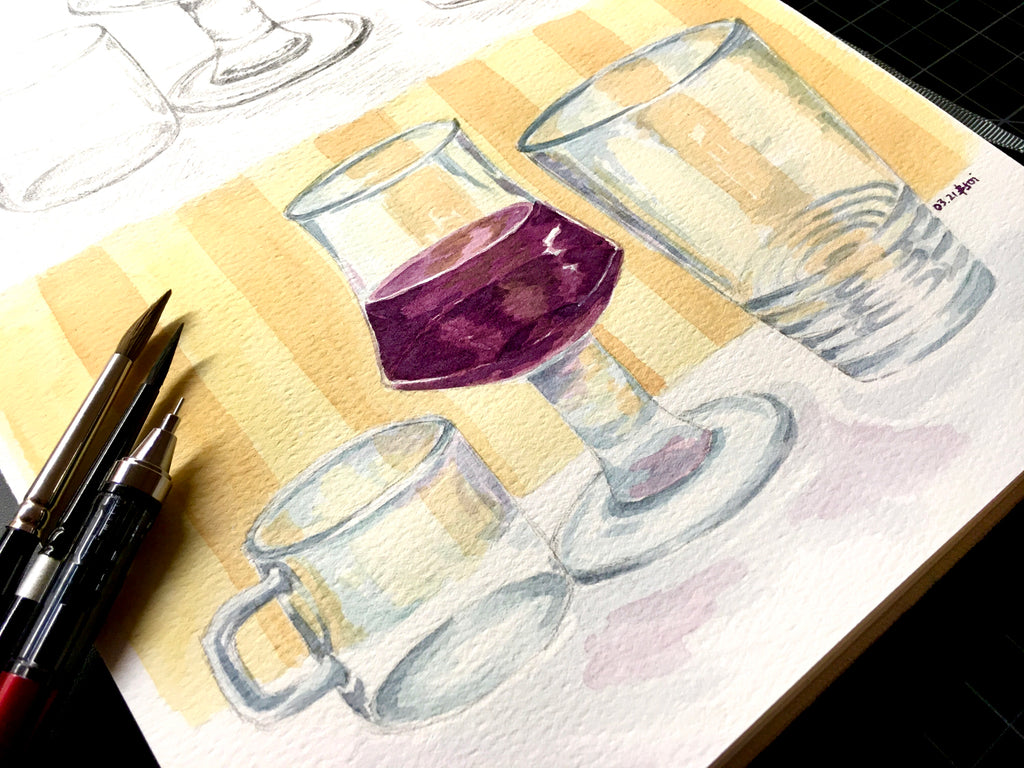
So let’s focus on more complex shapes, such as a wine glass (or any glass cup). For beginners, it’s best to have a white background, so you won’t be distracted by how the glass warps it. Next, do a quick outline of the cup, which will form the base of your drawing.
This next part is the most difficult – getting the values right. “Values” refers to the shadows and highlights in an art piece, so look carefully. Where is the glass reflecting light? Make sure to keep these areas white! Where are the shadows falling? Shade those in, adding a gradated tone if needed.
You’ll notice that most of the shadows are near the bottom and edges of the glass- are the areas where the glass is warping light the most.
These shadows and any reflective spots make it so the glass isn’t completely invisible at least until you bump straight into a glass door! But flat glass is always much harder to see since it doesn’t contain as many shadows.
Another trick is to realise that glass has a thickness to it as well. The thicker the glass, the more shadows you’ll see being warped within the material, so make sure you have a good angle to see where the glass begins and where it ends.
Just try not to add too many shadows – your drawing will end up looking too opaque to be glass, and lean more towards being something metallic instead.
Bonus tip: Plastic can look similar to glass, but it tends to be coloured and not quite as reflective as glass. You can apply the same tricks when drawing or painting plastic, though make sure to adjust the highlights on the object to match the material.
Colouring the Colourless

When you have a better understanding of the shadows and highlights created in a glass object- you can try painting it.
For your first time, I recommend using a neutral yet slightly cool colour like Payne’s Grey or mixing Burnt Sienna and Ultramarine Blue. You can also use a light blue-green colour for the mid-tones (since glass is naturally tinted, in a bluish-green from impurities).
Next, you can simply paint the cup according to the values you see and have practised drawing. Again, remember to leave some highlights! They will enhance the reflectiveness of the material, even more so if your cup is filled with some sort of liquid.
The next step to this practice is to fill your glass with water or wine or juice- if you prefer a little more colour.
Just remember that with this addition, the surface of the liquid will be a highlight, though its edges and areas where it touches the glass will be more shadowed.
This may all sound confusing, but just make sure to observe your subject matter carefully!
Tip: Your highlights will take on the colour of whatever colour is being refracted inside the glass or reflected on its surface, so just make sure to keep an eye on how your light source scatters these colours. It doesn’t necessarily have to be on the glass either; it could be reflected onto the table and/or background.
Overcoming the Glass Ceiling

The last and most difficult- step to conquering this material is to put an actual background behind your glass.
You’ll notice that the glass will warp the background a little, mostly around the edges. And if you add water to the cup, that changes the background again!
But in all seriousness, it’s best to take it slow and steady, especially if you’re just starting to understand how to draw or paint glass.
You can adjust the difficulty level after you’ve hit the proverbial “glass ceiling”, so don’t worry about all the extra frills until then. And always remember to observe! You’ll never go wrong with just a little more observation and practice.
Hope all these tips and tricks have helped in some way, and above all, have some fun!
Have you tried drawing or painting a glass object before? What other effects do you find difficult to paint? Let us know in the comments below!