
Landscapes are a pretty broad subject, no matter the medium.
There are mountainous landscapes, field landscapes, forested landscapes…as long as there are land and little to no people or animals hanging around, it’s considered a landscape.
For this very reason, it’s difficult to get tired of or exhaust this subject, as the earth is very big, and nature is ever-changing.
And while you may not be interested in becoming the next Bob Ross of watercolours, it’s still good to practice painting a few landscapes, whether you’re painting Plein air or just the view from your favourite window.
So if you’re ready, pick a landscape to paint, and grab a set of watercolour tools appropriate to whether you’re painting indoors or out!
Viewfinder and Composition
 Actually, one of the easiest places to get stuck when painting landscapes is the very first step – picking a landscape to paint.
Nature’s beauty is certainly dazzling! But let’s do a quick breakdown on landscape composition, and how to help your decision-making by using a handy tool called a viewfinder.
You can make a viewfinder out of simple cardboard. I recommend using an A6 sheet of thick black paper, and cutting out a rectangle in the middle, leaving a 1cm thick frame.
Alternatively, if you have a smartphone or camera, that works too.
Even better would be if it has those vertical and horizontal lines that divide the view into thirds, which many artists and photographers refer to as “the rule of thirds”.
This is a general rule in landscape composition (or any kind of composition) – to divide it into thirds. For example, it would be strange to have the horizon line right smack in the middle, as it feels like you’ve just chopped the painting in half.
Instead, put it a third of the way up or down, and voila! It’s much more pleasing to look at this way.
Bonus tip: The eye is a curious thing, in the sense that it prefers odd numbers to even ones. For instance, looking at a painting of two apples doesn’t feel as pleasant as a painting of three, since our brains find it difficult to pick one of the two apples to focus on first.
The one with three apples is much easier, as our eyes would be naturally drawn to the middle one first before moving to either side. This is why the “rule of thirds” works so well!
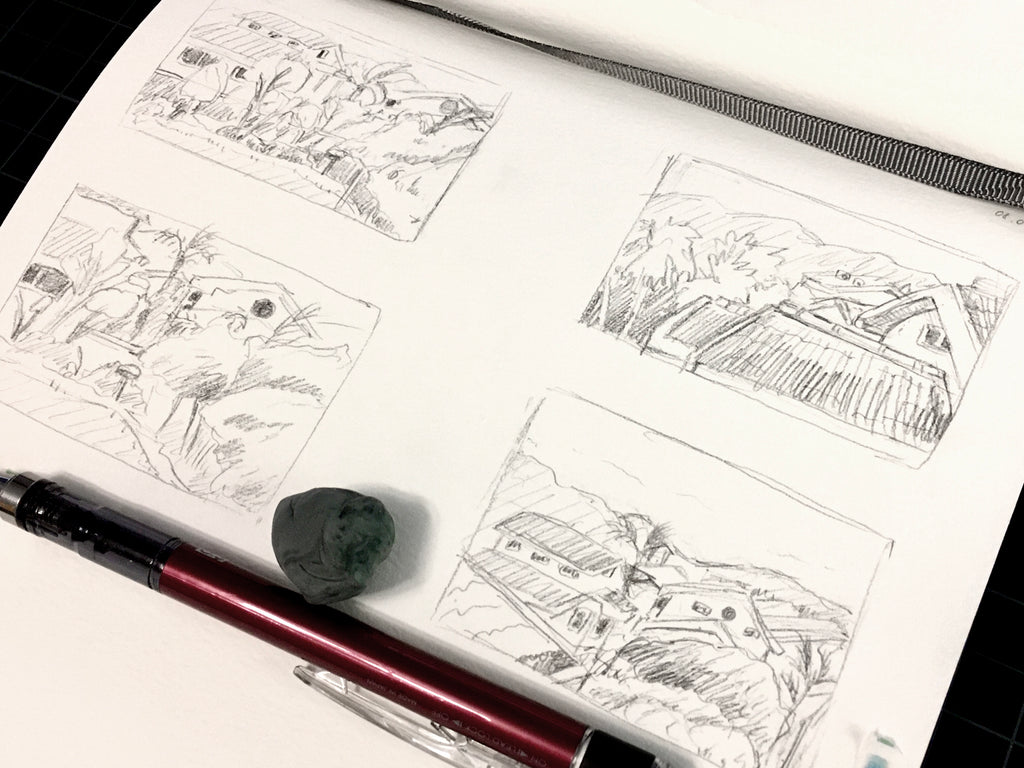
With a viewfinder, you can move it around to see what looks best within the frame. As a test, you could even do some quick thumbnail sketches or monochromatic paintings, and adjust as you see fit.
Layers Are Your Friend

After deciding on the composition, you can do a pencil or watercolour sketch to outline the main areas in your landscape. And if you’re really bold, you can go straight into painting your first layer.
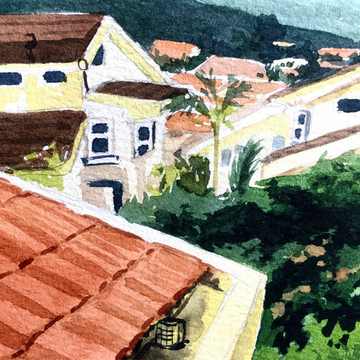
The keyword here is “layer”, and for landscapes, it’s best to do them from back to front, light to dark. So start with your sky first, then slowly work your way towards the foreground.
In the painting above, after the sky, I painted the mountains, then the rooftops in the background, and finally the trees and rooftop in front.
Like the first pancake, the first layer of any watercolour painting won’t look very good, and that’s fine. You’re basically laying the groundwork of each major element in your landscape painting.
After you have a strong foundation, you can start the next layers by building up the contrast, tones, and colours. Eventually, you’ll find that the painting will take a life of its own.
Vary Your Edges

Once you get to a certain point, remember to switch between soft and hard edges (you can find a more in-depth tutorial here). Soft edges are great for fluffy things, like clouds, mist, and things that are further away.
Hard edges give a good contrast to things in the distance, so use these more when painting foreground elements.
You can create soft edges by wetting the paper with clean water before adding the paint, and hard edges by painting directly onto a dry surface.
A Touch of Detail
 Last but not least, add a touch of detail to the main area of your landscape. This could be a tree in the foreground, or a rock, or a farmhouse – anything that you’ve determined as your focal point in your composition. You’ll notice it really draws your eye into the painting!
It also adds even more contrast to make the focal point pop, without having to spend too much time trying to paint every little detail in the entire foreground.
Of course, you could try to paint every little detail, but it’s easy to go overboard and make it difficult for the brain to know what to focus on.
The key here is finding a good balance – too few details and the painting can look unfinished or blurry, too many and it looks too “busy”.
Sticking the Landing
 Apart from practicing, the best way to know what makes a good landscape painting is to look at good landscape images and even study them by copying them.
And if you can easily go out and do some Plein air landscape painting, take advantage of that! It’s great to be able to paint from real life.
If not, there are a plethora of landscape pictures you can find online, or studies you can do on your favourite landscape artists, photographers, and even movie scenes.
As mentioned before, this is an inexhaustible subject, but it’s a rewarding one, especially when you see your landscape backgrounds improving at a rapid rate! It’s an opportunity too good to miss, whether you’re just starting out, or have been “landscaping” for a long time.
Have you done any Plein air landscape painting before? What kind of landscapes do you prefer? Have you tried doing the same landscape in different seasons and/or weather? Let us know in the comments below!