Traditionally, artists are taught to work while sitting and standing but are acclimated to both. Everybody has their personal preferences and there is no one correct way to paint–but whether it be a large canvas or a drawing requiring a fuller range of movement, standing while creating can actually enhance your creative process!
Spend Your Energy Wisely
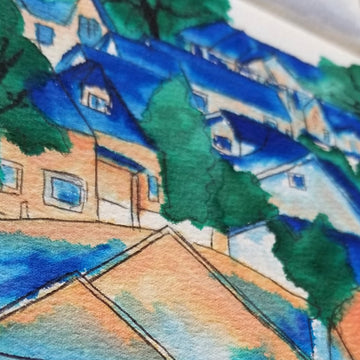
For this exercise, I painted while looking out my window. Standing offers a sense of urgency. The urgency is helpful for sketching and applying colour a little faster than while sitting down. Instead of getting lost in details, you instead focus further on basic shapes and composition.
Parts of my sketch were in waterproof pen, some were outline first in pencil. The combination of both helped me nail a composition I felt satisfied with. Spend the energy drawing and painting areas you are interested in. Potential sore legs won’t be worth it if you're not happy with the subjects. I picked neighbourhood houses that looked fun to study instead of ones that weren’t exciting.

To make the sketchbook easier to hold, clip it to a small art board. For extra storage while standing, balance pens and brushes in the clips, the sketchbook elastic, your pockets, or behind your ear.
I selected pre-filled watercolour pigment brushes and a water brush for blending out. A small palette will also work if your setup can handle it. (The Etchr Mini Palette is compact and carries 37 colours–perfect for this setup!) It’s ideal to have ready-to-go paints and a water brush. It’s overall less messy and easier to handle. Likewise, watercolour pencils would be great for this experiment. Because the colour palette will be limited, don’t worry on pre-mixing colours to match the subject. Choose a light, a medium, and a dark colour. The exercise is to work on shading and blocking out space before your legs are overtired. To simplify things, assign one colour per subject matter. For example, beige in house sidings, blue in roofs, green in trees. This won’t just make it cohesive but speed the process up along too. Because of this I spent increased time sketching rather than actually painting.
Be Prepared

My coloured brushes were opaque pigments so I laid down dark shades first then blended out with the water brush. Remember to leave in negative or white spaces. It’ll help the painting dry better and leave out the opportunities for unwanted blending or drips over edges. A paper towel could come in handy here in case of any drips. Chances are the sketchbook won’t be perfectly flat while you're holding it so runoff can happen. If using pre-filled cartridge brushes, don’t introduce them to excessive watery washes. It’ll dilute the opaque paint inside the brush. You may however use the water brush to “liven up” dried colours for blending again.
Brushes not used frequently go back to the clips, behind the ear, or even between a gap of previous pages. This is where I stacked my six tools as it is important to free up your hands. Colours actively being blended together need to be super accessible. Layers are the important details here, so make sure the sketchbook holds up to drawing, erasing, washes, touch ups, and blending. Finally when the painting was dry I inked out tree trunks and branches for a little extra definition.
Save the Details
You may still achieve details while standing but it can be challenging. Using an easel for stability is an easy fix instead of holding onto your book. I like to hold the sketchbook close to get rid of the shakiness.

Standing and sketching helps retrain your eye for important elements other than details. Sketches can be loose, light, wiggly, dark, or pin straight. Anything that naturally flows from the pencil. Save the detailing for the paint. Painted details look textured and perfectly layered compared to drawing materials. Besides, they tend to be less harsh and faster to paint as opposed to drawing them. With practice, techniques learned here will be implicated in more intense or time consuming pieces. Compositions will now be completed quicker. Plus it'll give your legs a tad stretch as well!
Test Out Time
In total, this piece took about an hour and a half. It didn’t feel like too much time but not little enough to feel like I hadn’t painted at all. It was a balance of time commitment, “walking speed” sketching, and “racing speed” painting. You can spend as much or little time you have on an experiment like this and almost any subject matter outside or inside the studio. Or practice increasing time limits to train your mind and legs to standing art. If you want to use up less time, consider limiting your time frame to encourage speedy sketching and painting. To test this method, I'd recommend going on a walk with your sketchbook and brushes. Sketch simple surroundings for a few minutes or seconds then paint. If you're stuck at home, check out this timed painting exercise that's perfect for a challenge in a pinch! The important part is to enjoy and learn from the experiment. Take breaks when you want to. This is your own race, you decide how long it’ll take.
Do you like painting while standing or sitting more? How often do you switch it up? Are you detailed while standing or gestural? Tell us below!


