No, I’m not going to tell you to join a gym! But similar to an athlete’s warm-up and stretches before diving into their sport, artists should exercise their drawing or painting muscles before starting a painting.
Here are some quick 10-15 minute exercises you can do to loosen your hands so they can perform to their best ability!
Start Simple

Firstly, I highly recommend doing your exercises on scrap paper to save both money and the environment. And while you could do them with a plain old stick instead of a pen or pencil, the feedback you’ll get is a little different, so it’s better to use a real writing or painting tool.
If you’re planning on drawing with a pencil, use the same pencil for your exercises, and likewise, if you’re using a pen – whether graphic or fountain.
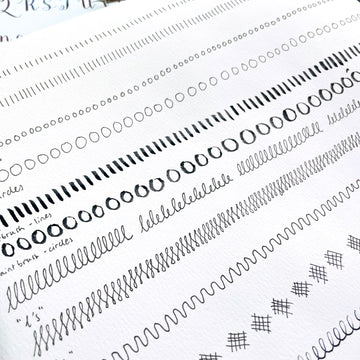
For the first exercise, start with simple vertical lines. You can do a few rows, depending on how long you want to “stretch” for.
Next, do some small circles. Try to keep your lines and circles as identical as possible, as this will help fine-tune your motor skills. Circles and lines help in a warm-up, as you could argue that almost anything can be drawn with circles (or curves) and lines!
If you’re planning on painting, you can do the same with a paintbrush. With a paintbrush, you’ll need to control how much pressure you use, so your line width is consistent throughout painting both the lines and the circles.
Note: For the painted circles, they can look more like a calligraphic letter “O” instead of a doughnut that has the same line width throughout. They just need to look the same to each other while painting.
If you’re using a dip or fountain pen, your line width will vary like with a paintbrush, though the amount of pressure you use will be vastly different. This is why it’s important to know what tool you’ll be using ahead of time, so you can do your warm-ups with the right tool!
Getting Squiggly

When you’ve done a few rows of lines and circles, you can move to something more complex – the squiggles.
The first involves a simple looping motion, kind of like writing a cursive lowercase “L”. For a real challenge, you can alternate between lowercase L’s and E’s, if you feel your hand has loosened up enough.
Next is looping with a twist, like connecting the letter “S” so it loops one way before going back. The hardest part is trying to keep your squiggles consistent! If you’re having trouble, you can draw 2 parallel horizontal lines using a pencil and a ruler, and try to keep your squiggles within these lines.
Final Stretch

Hopefully, your hand is warmed up by now! If not, you can try these last few exercises.
The above is the “snake”, and again, try to keep the height of the humps consistent.
Next is the crosshatch, which is a common shading technique used in drawing. For this one, try to keep your lines even. And while you don’t have to crosshatch in a way where your lines are perpendicular, it’s good to do it for the exercise

If you want a true challenge, you can even consider cursive handwriting or lettering as a type of exercise! With the dawn of computers and keyboards, not many people even choose to write by hand anymore. But if you’re like me and had to attend a handwriting class as a child, you probably remember having to practise writing each letter in cursive, in both their upper and lowercase forms.
These exercises are often very effective, as they solidify a hand’s muscle memory to create the same lines with consistency. Learning calligraphy takes handwriting class up a notch, as it factors in the amount of pressure you need to put behind each stroke!
The downside is that handwriting or calligraphy practise is best for calligraphers, or for those who want to improve their handwriting. This means being good at calligraphy doesn’t necessarily translate to having great drawing or painting skills, as you’ll need to practise drawing or painting to be good at those!
On the flip side, it’s a great way to practise control – control in terms of where your line is going, and how much pressure you’re exerting. It all depends on how much time you have to practise!
Tip: If at any point your hand starts to hurt, you should take a break! It may also be an indicator that your grip is too strong, so try to relax. The aim is to loosen those hand muscles, not make them cramp.
Conclusion

Ultimately, these warm-up exercises are just for warming up. They can’t replace actual drawing or painting practise, kind of like the training phase for an athlete. They’re just meant to loosen your hand muscles, which will help in terms of creating the strokes you want while also preventing carpal tunnel or hand cramps.
They’ll also help in terms of being able to practise for longer periods before having to take a break! In addition, they can stave off the “blank page” fear, even if you’re only using scrap paper.
In any case, why not try adding a few of these warm-up exercises to your practise regimen? They’re short yet sweet, and especially helpful if you don’t draw or paint daily. But whether warming up is for you or not, the important thing is to see if it’s helpful for you, and if so, then go for it!
Do you usually do warm-up exercises before drawing or painting? What’s your method of loosening up those “art muscles”? Let us know in the comments below! Also, feel free to subscribe to our email newsletter for even more tips and tricks about art! We’ll keep you up to date with product and new workshop releases as well.


