A new year has already begun, but it’s never too late to start a bullet journal! It’s a great way to organise your time, plus it can be a relaxing or even therapeutic way to order your thoughts and emotions for everyday life.
What is Bullet Journalling?
Also known as “Bujo” by practitioners and fans of this method, bullet journalling was conceived by Ryder Carroll, who stated that it’s a way to “track your past, order your present, and plan your future”.
It’s similar to keeping a journal or diary (hence the “journal” part), but instead of just writing out what happens each day, it also integrates the function of a planner, plus a few more extra features which make up the “bullet” part.
The best thing is that there’s no one fixed way to bullet journal! But for the sake of starting, I’ll demonstrate a few of the popular ways to bullet journal, and we can go from there.
Step 1: Basic Tools

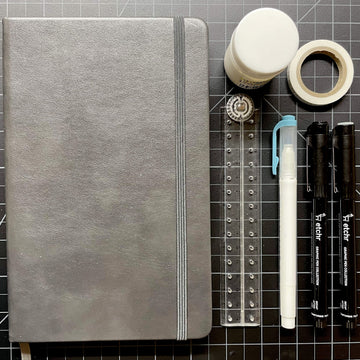
First off, you’ll need a journal! Different people have different preferences, but most go for a journal with dotted paper and paper that’s smooth to write on. It should also have at least 120 pages; enough for 3-12 months of journaling! If you plan on adding a wetter media like watercolour, you may also want one with thicker paper as well (around 150gsm).
The great thing about dotted paper is that it’s more subtle than grid paper but still helps keep things aligned (unlike plain paper).
Other optional but nice-to-have features for a journal would be an attached ribbon or ribbons to bookmark specific pages, and an inner pocket to put other tools like sticker sheets or paper cut-outs for decoration.
Another thing you’ll need is some sort of writing instrument. Fineliners are good for both drawing and writing, though you can also use a fountain pen for a different writing style. In fact, you can even use a simple ballpoint pen! Just make sure the ink won’t smudge easily, and that it’s something you’re comfortable with.
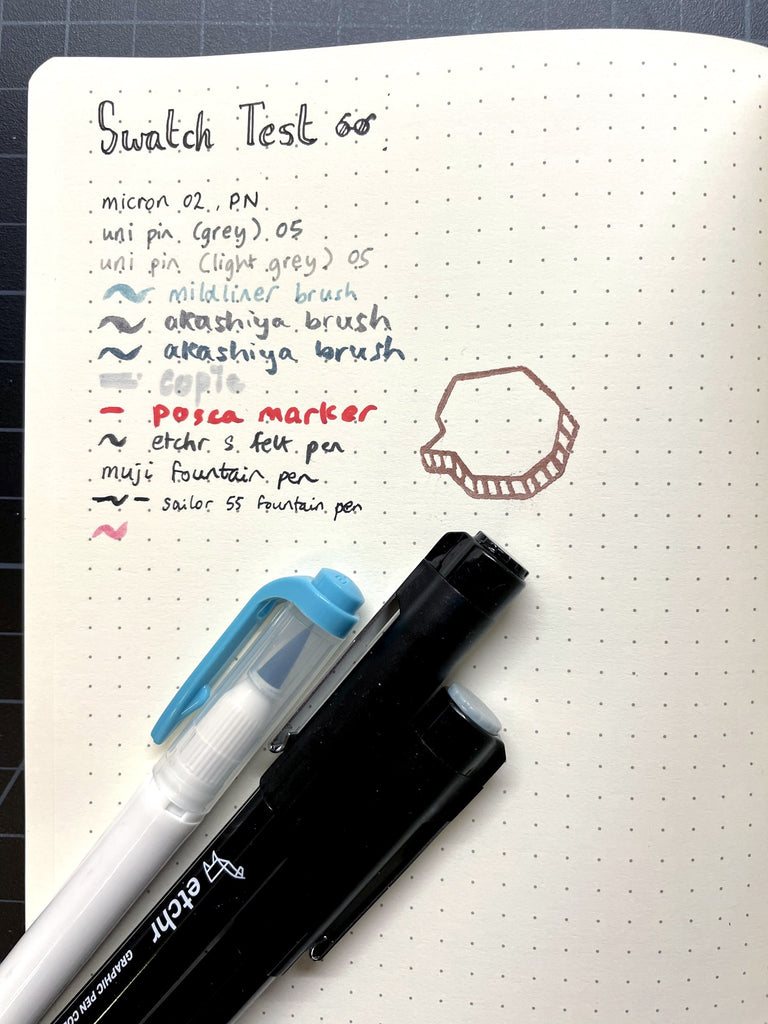
Bonus tip: If you’re not sure how your pens, markers, etc will perform on paper, you can do a quick swatch of them on the last page of your journal. Check for bleed-through or ghosting as well (i.e. how visible the ink is on the backside of the page) – some people don’t mind it, while others avoid it by buying journals that have thicker paper.
That’s pretty much all you need to start a bullet journal! Some extras you might want to use for decorating can be markers, white-out (to fix mistakes), highlighters, paint, stickers, stamps, and washi tape, but it’s up to you how elaborate or simple you wish your journal to be.
Step 2: Numbering, Naming, Key, and Index Page

Once you’ve chosen a journal, I recommend “breaking in” the spine. This is simple – just open the book around the middle page, then press down to make the book open flat. Then, take about 5-10 pages at a time from the left and the right, and press down again to flatten the book. Keep doing this until you reach the front and back covers.
You’re essentially creating creases in the book’s spine to loosen it up and make it not so stiff, which will help it lie flat when you start writing and drawing in it.

Next, claim your journal and write your name on the first page. You can also write your phone number if you’re worried about misplacing your journal, but that’s up to you. And you don’t have to, but a little decoration here will be nice, too!
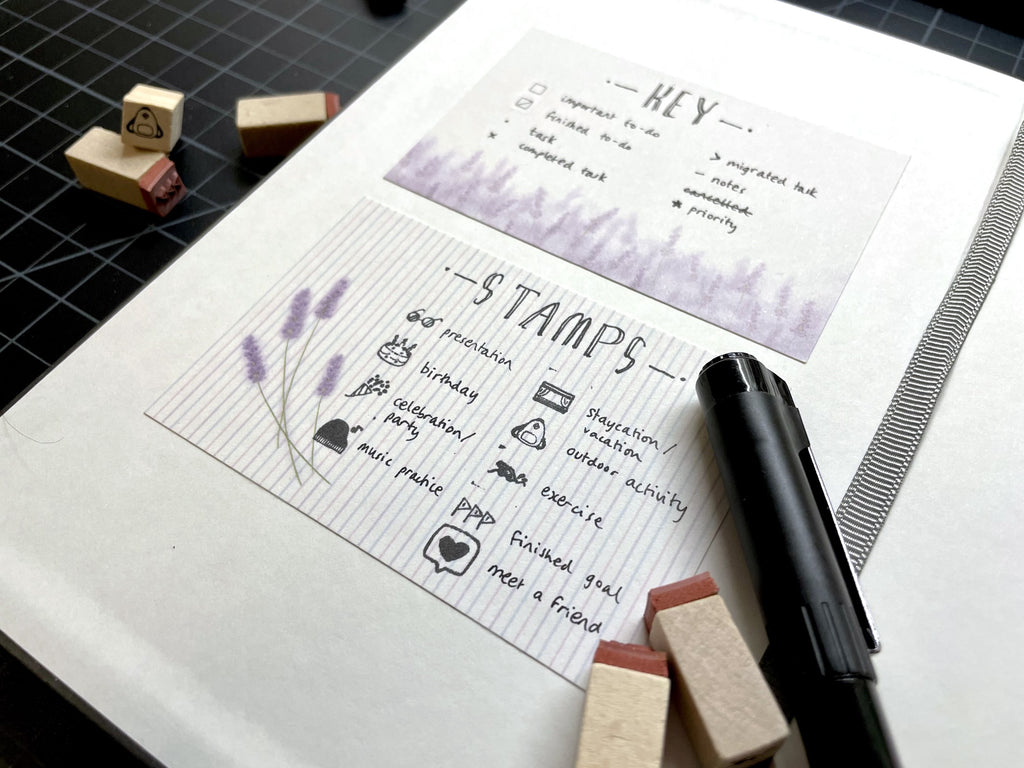
To lay a good groundwork, create a legend or a key that explains each symbol you plan to use in your journal, to make it easier to note down. For example, I use a set of stamps to plan different events, where the birthday cake symbol is for someone’s birthday, the backpack symbol is for outdoor activities, etc.
And you don’t have to buy a stamp set – you can draw and create your own symbols, depending on what you want to be planned!
You also can have more than 1 set of symbols to refer to; for instance, another set can be for setting and marking goals, visions, and priorities. Again, the symbols are just to help make it easier to tell what you’re looking at when glancing at the page, and so if it’s your first time, it’s always good to have a key to explain your symbols and keep them consistent.
Tip: I recommend writing or sticking your key(s) on the inside of the cover, so they’re really easy to see and refer to during your bullet journal journey.

Lastly, number the pages (if they aren’t numbered already). This is so you can create an index page that will direct you to different sections of your journal, and make it easier to find the right section to jot down new notes, thoughts, and events.
For your index page, you’ll want to make it the first or second page after the page with your name on it. You’ll also want to write down each section’s name and page numbers after you plan out how many sections you want, and how many pages each will take.
Note: You may find that the index page won’t be complete until your journal is. That’s completely fine too, though I would recommend that if you’re not sure how many pages a section will take, leave that as the last section, otherwise you may run out of room for a different section.

Tip: If you want to keep your tables, calendars, and such consistent, you can use a page to count the boxes and measure the sizes you want for each item you plan to draw.
Step 3: Concrete Goals

Like me, you may hate making new year’s resolutions. But for Bujo lovers, making goals is an essential part of organising life, because without a clear purpose or direction, you either start plateauing, or chaos starts creeping in.
Writing down your goals also gives a concrete form to what you want from life, and breaking them down into smaller steps makes them feel more achievable! So you’ll want to use a page (or more) to write down your main goals for the year.
You can break it down into different categories; for example, one to improve your health could be to set a goal of regular exercise and visiting a counsellor each month. Or maybe you have some career goals you’d like to see happen in the coming year.
In any case, try not to overwhelm yourself with too many or too difficult goals, and where possible, break them down into lifestyle changes or habits you can make to keep them doable.
On the other side, you can use the page for a list of things to remember throughout the year, whether it’s a random idea you get, a new discovery, or anything you’d like to keep in your mind.
Step 4: Year in a Nutshell

Since you’re also using your journal as a planner, it’s also a good idea to dedicate a page or two for an overview of the coming year. For those who like to draw or doodle, you can do a splash page to introduce the year, or jump straight into laying out the year.

Essentially, you’ll need to draw a 12-month calendar with each month and day of the week labelled, and highlight or mark off any big events, such as holidays, anniversaries, and/or birthdays.
Feel free to decorate this page however you like! If you’re stuck on ideas, you can always look online for inspiration. The main thing is to keep your journal looking clean and tidy, so the main bulk of the information isn’t lost in the frills.
Step 5: Monthly View

Next is to create an overview for the month. Again, draw a calendar here, but enlarge it a little so you have a bigger square or rectangle for each day within the month. Decorate it however you’d like as well.
You can use your event symbols here, or you can be more creative and draw out any events you have planned! Birthdays can be marked here as well, or other events.
Tip: If you don’t have any events planned in advance, you can always mark an event after it happens. It helps keep your journal clean too, in case an event gets cancelled or changed.
Section off an area to take notes and jot down ideas, and set some monthly goals too. This breaks down your year’s goals even further, so hopefully, it will help keep each step to forming good habits more bite-sized.
You can also create a habit-tracker, either with a grid to check off each time you do a good habit, or some sort of system to mark off each day you take a step closer to your goals. Some people also create a mood tracker, where you fill in a circle with an expression that represents your mood for the day, though you can leave this for your weekly log instead of having it in the monthly one.
Step 6: Weekly/Daily Breakdown

The final breakdown will be the weekly/daily one, which will feel the closest to traditional journaling. Here, you can write a to-do list for each day, keep track of what happens, and mark down the time and place for any events.
Tip: You’ll most likely be spending the most amount of time here, so I highly recommend setting aside some time in the morning or the night before to write down what you need to do for the day. It helps keep things in order and motivate you to get things done, as your thoughts and actions have been organised already.
It’s also a good opportunity to write down something you’re grateful for. Bullet journalling is known as a method for merging mindfulness with productivity, so you can get things done while also giving yourself room to breathe, relax, and reflect on life.
If you still have some extra space in your journal, why not add some customised trackers? You could keep a mood tracker (I’ve drawn an emoji for my general emotional state every day), a weather tracker, an expenses tracker, and so on.
This makes Bujo one of the most customisable ways to keep a planner and journal, but try to limit yourself on what you’re tracking – it’s good to keep things simple, too.
Step 7: Don’t Give Up! And Have Fun

Bujo may be a bit overwhelming at first, especially if you’re not an organised person! But like with any good habit, you must stick with it before it sticks with you.
The best way to keep good habits is to make it fun for yourself! If you like doodling, add some on the monthly pages. If you like daydreaming, write them down as ideas to possibly revisit in the future.
Just don’t make bullet journalling an excuse for getting things done, though! Sometimes, we might spend too much time planning things and not actually carrying them out.
The more you Bujo, the more you’ll understand yourself, what you want out of your bullet journal, and how your mind works. You’ll also form your own preferences on what kind of journal you want to create, so don’t feel like you have to stick to the same format every year, or even month!
Even for the steps above, you can always add or take away sections that you don’t want, or mix and match other ideas that you might have from watching other Bujo-ers. The key is to make it work for you so that it’s helping you streamline your life rather than feeling like an extra burden.
That’s it from me! Wishing you a happy start to your bullet journey, and perseverance for the year (and years) to come.
Have you recently started a bullet journal? What do you find has helped you organise your life? Let us know in the comments below! Also, feel free to subscribe to our email newsletter to stay up to date with our art workshop schedule, giveaway announcements, and new product releases. There’s always something for everyone, no matter your skill level!
1 comment
I never was completely satisfied with a planner until I started doing my planning using the bullet journal method. Now all I need is a notebook with a dot grid (that’s just my personal preference) and I can customize it to be exactly what I need. My only advice is—don’t be scared of the blank notebook! I had a friend who got the notebook and supplies but never started writing on it because she was intimidated by all the people online with their perfect drawings and handwriting on the journal pages they show online. Just enjoy yourself and don’t worry about mistakes. I misspell “Wednesday” in my journal about every other week, and what can I do but laugh about it?
———
Etchr Lab replied:
Yes!! Just enjoy and don’t worry about mistakes! 🧡
———
Etchr Lab replied:
Hey April! Thank you for sharing this with us, and you are absolutely
right! Making art is also about embracing mistakes and learning every step
of the way. ❤