Drawing animals can be wonderfully relaxing, and provide you with something adorable to hang on your wall.
Many animals are a bit more forgiving to draw than humans are because our psychology picks up on more errors in a drawing of a human than of anything else.
However, the rules of anatomy still apply when drawing animals, and there are some additional things to keep in mind too, such as the texture of fur and the different shapes of animals’ eyes.
This article provides examples and directions for how you might draw a dog realistically so that you can apply the principles to other projects.
Read until the end for extra notes about stylizing your animals, and drawing fur!

The thing to remember about animals is that underneath the fur and the colour patterns, there is a structure of bones and muscles just like on a human (although the bones and muscles are going to be different).
Oftentimes people will begin a drawing with structural forms like spheres and rectangles to visualize the dimensionality, but for me, it is more intuitive to just do a line drawing. I can do this shortcut because I have practised enough.
If you are a beginner, I recommend doing some studies of just the geometric shapes to learn anatomy.
When you do the first part of the drawing, whether you are doing the geometric shapes or the plain lines, be sure to measure carefully.
Don’t press hard with the pencil, and don’t continue until the measurements are correct. 
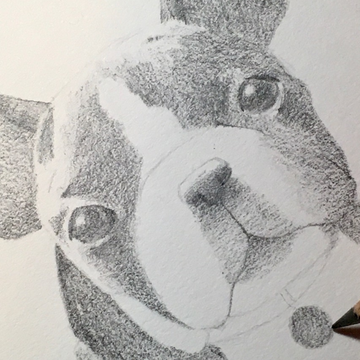
When the overall proportions are measured properly, you can begin to include faint lines for other details, like the different colours on the animal, as well as bone landmarks (on this Boston Terrier there is a prominent bone above each eye that indicates the shape of the head really well).
Keep these lines faint, especially the lines indicating where the fur changes colour, and don’t make them too precise either because fur isn’t really precise.
Once again, don’t continue until the lines are correct. It’s far more difficult to correct mistakes after shading has begun.

Now, very lightly shade in the darkest values. Not all of the values, just the darkest ones. This Boston Terrier is mainly black so there’s a lot of dark value to fill in straight away.
Pay attention now to the way light hits the eyes because this is how the animal will look alive. Do not press with the pencil while doing any of this.

Now it is time to take those darkest values and make them darker, then lightly shade in the second-darkest values. You want the shading of the image to be “proportioned” the same as it is in the reference.
If you want your image to be shaded more lightly than the reference, just leave out the lightest shading to keep the values “proportionate” to the reference.
When you are darkening the values, switch to a softer lead instead of pressing harder. You don’t want to press hard.
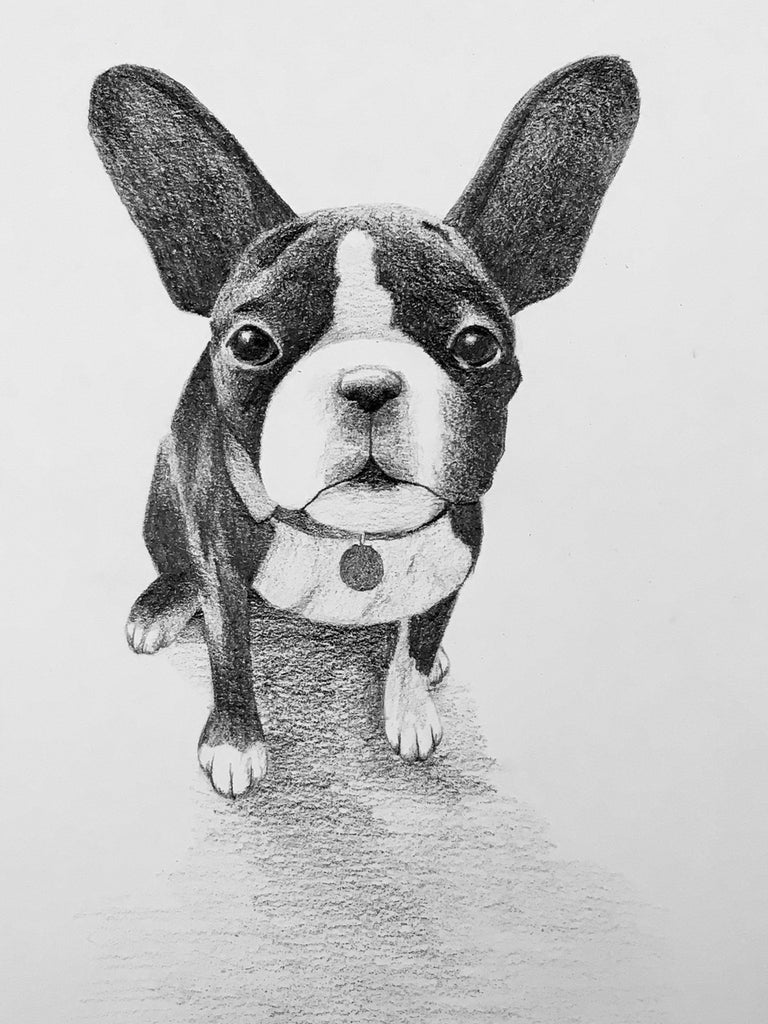
To finish the dog, continue deepening the values in gradual layers until you are satisfied.
Only press with the pencil when creating sharp edges or when the value needs to be black and you are positively certain you will never erase that part. This can only happen at the end.

A fun way to bring your animal drawings to life further is to colour them in. A great way to do this if you are a beginner is to put it into Photoshop and colour it digitally.
Simply duplicate the layer that the drawing is on, set the copy to multiply, and colour with normal layers in between those layers.
This is a super forgiving method for colouring that allows you to start over and change whatever you want, so you can really learn to use colour.
When you are more confident you can move on to physically paint the animals, but you might end up enjoying the Photoshop method for the look it gives! 
Now for a word on drawing fur. Boston Terriers don’t have long fur, so the edges of that drawing may end up being almost as hard as if there wasn’t any fur at all.
However, for this Ragdoll cat, the realism effect will be more convincing if you don’t draw any lines around it at all, and instead draw little indications of fur.
The more precise lines can go around the ears, where the fur is shorter, but not around the really fluffy parts of the cat.

Now for a word on stylization. To design this character, I looked at the overall fur structure of a longhair cat and reduced it to clean-edged shapes.
Without consideration of long fur, the cat’s head would essentially be a circle.
When you stylize a longhaired creature, decide how many indications of fur texture you want, and what shape the fur makes in the animal’s silhouette.
When you stylize an animal to be doing human things, you have to consider how you’re going to convert its paws into hands.
I went with a very simple paw design for this character because I thought too much detail would make him a bit creepy.

This squirrel is even more simplified than the cat character. Note how I gave him textured fur for the tufts on his ears, to indicate that that’s all fur and not part of the ear, but the rest of him is smooth for visual simplicity.
His paws are the most simple design I could give because squirrel “fingers” are so tiny.
He’s standing in long grass in this picture, but when he isn’t in long grass I give him simple shoes, and I haven’t really thought about what his feet look like.
Don’t feel like you have to design every single aspect of your character if you’re only designing for yourself, and you don’t have a need in the project to know something like what the character’s bare feet would look like.
The best way to learn to draw animals is to draw a few realistically first, and pay close attention to the anatomy and bone structure.
That way, when you go to stylize a character, it will be more apparent to you which features you should simplify and which you should leave more complex.
Look at other artists’ interpretations of animals too, because there is a huge range. I hope this article has inspired you!
2 comments
Hi Sophia! First, break down the animal into basic geometric shapes and go from there! If you’re looking for a more hands-on tutorial, feel free to check our online classes at www.etchrstudio.com. We have plenty of animal classes here: https://learn.etchrstudio.com/catalog/search?catalog_filter_3613=20077
I tryed to draw it out it’s really hard do you know a good place to start on the animal?