
THE HEAD
This is the first blog post in a series that will cover the basics of drawing human heads and facial features for stylized illustrations.
There are many places you can look to learn, in-depth, all of the nuances of head and facial anatomy.
This type of understanding takes years to learn and develop and is not really necessary unless you are creating photorealistic art.
But it is important, even as an illustrator who creates very stylized illustrations, to have a foundational understanding of human anatomy that will allow you to experiment and design characters that feel believable and life-like.
For me, learning to draw human heads and faces has been one of the most challenging aspects of my artistic journey.
Our eyes are naturally drawn to faces, so if there is a face in your painting or illustration, it's going to be the first place people will look.
Faces are complex, but as humans, we are quite adept at recognizing and identifying other human faces as well as reading expressions.
You would think all of this knowledge would be helpful when it comes to drawing a face, but I actually think our innate knowledge of faces makes it more difficult to draw one that is convincing.
Humans are such facial experts that we become very aware when something is wrong with a face.
So let’s dive into what you need to know to draw a well-constructed head that gets attention for the right reasons — because it’s beautiful and full of charm and personality — and not because something is “off” about it.
Basic Construction
You can’t have a face without ahead, so before we can talk about individual features you need to know how the head is constructed and how the features relate to one another.
Knowing where individual parts are anchored within the structure of the face will prevent you from drawing faces that look flat or have “floating” features.
I will go into more detail about how to draw different facial features in future posts in this series, but for now, we can use simplified shapes to determine size and placement.

When drawing ahead I always start with a circle. Then I add the jaw and the neck. Drawing the X and Y axes helps to establish proportions.

Directional lines that follow the basic contour of the head are useful when it comes to drawing it from different angles.
Always remember the basic rules of perspective when drawing a face. Directional lines that are above the eye level of the viewer will curve up. Lines that are below the viewer’s eye level will curve down.

Notice in a profile, the placement of the jawline and how the head connects to the neck, both under the chin and in the back of the skull.
Features and Proportions
The look and appeal of your character will be determined by the placement and proportions of the features.
In an average face, the features are spaced relatively evenly from the brow to the bottom eyelid, the bottom of the nose, to the mouth and chin.
Eyes
On the average adult, the eyes will sit on top of the X-axis/centerline.
Nose and Ears
The bottom of the nose will be about halfway between the X-axis and the point of the chin.
Noses vary a lot in size and shape. The bottom of the ears typically lines up with the bottom of the nose and they tend to be approximately the same length.
Mouth
The mouth is placed halfway between the bottom of the chin and the bottom of the nose.
Keep in mind that in humans, the bottom jaw or mandible is not fixed. It opens and closes, causing the face to squash and stretches with changes in expression.
Children
One of the biggest issues I see with beginner illustrators is that they tend to draw children with the same facial proportions as adults.
This results in children that look like little old people. Notice that children have rounder faces. Their eyes are larger and they sit lower and farther apart.
Also, notice that the facial features of a child are still spaced evenly, but a bit closer together. The face on a child fills a much smaller portion of the skull than the face on an adult.

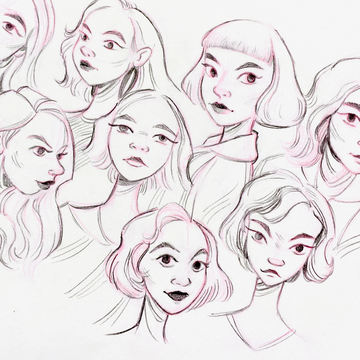
Exaggerating Proportions
Once you know the “rules” and have a good understanding of the average face, you can have some fun.
Try varying the proportions and placement of facial features to change the look and personality of your characters.
Have fun experimenting and remember that the more heads you draw, the better you will get at constructing faces from your imagination.

Check back soon for my next post where I will go into more detail about drawing eyes and eyebrows.
1 comment
Very helpful for this beginner! Can’t wait to have AI analyze my sketches and help me make corrections and learn. PD
———
Etchr Lab replied:
Hi Paul,
I’m glad you found the post helpful! Drawing faces is such a fun challenge, and practicing consistently is the best way to improve. Using AI or other tools can be a helpful supplement, but nothing replaces observing and experimenting with your own sketches. Keep going—you’ll notice your skills growing with each head you draw!
Warmly,
- Ânia from Etchr
ÂNIA MARCOS Art Director
ania@etchrlab.com <simon@etchrlab.com>
etchrlab.com | Instagram <https://www.instagram.com/etchr_lab/> | Facebook <https://www.facebook.com/EtchrArtClan/>
Etchd Lab Pty Ltd | ACN 617 485 444