
Dangerous yet mesmerising, fire is the element that is arguably the most difficult to paint out of the different elements (which according to the Ancient Greeks are fire, water, air, and earth).
Even more formless than water (which you can learn how to paint here!), fire is harder to paint because it generates its own light source. In this watercolour tutorial, I’ll show you some simple tricks to get an idea of how to create this glowing illusion on paper, so hopefully, you’ll feel more comfortable painting these fiery scenes.
Playing with Fire

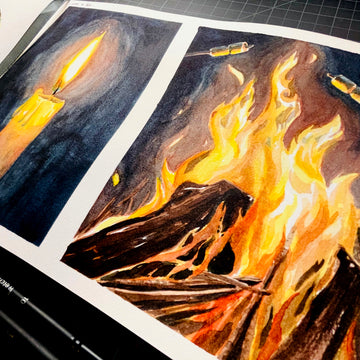
First things first, is to decide what kind of fire you’d like to paint. Is it small, like a candle? a campfire perhaps? This will affect the size of your glowing effect, and possibly the colours you use.
If it’s your first time, I recommend starting with a single candle. You can either light a candle and take a picture of it or do a quick search online. That will serve as your reference photo.
You could paint it like a still-life, but it's not so fun painting in the dark with a single candle as your light source!
The next thing I want to emphasise is contrast. While it’s possible to paint a lit candle during the day, the best glowing effect is done with a sharp contrast between light and dark.
With this in mind, prepare yourself to paint at least 3-5 layers! This means you’ll need good quality watercolour paper that can hold enough water for all these layers.
I also recommend using your standard primary colours to paint – yellow, red, and blue. Try to use a darker blue though, like Indigo or Payne’s Grey to help create darker shadows.
I’ve also included a lighter blue, as the very base of the flame tends to burn blue (meaning it’s the hottest part of the flame).
Turning Water to Fire

The next thing to note is the shape of the flame. If it’s a small fire, it will be the typical “waterdrop” shape (the irony!).
Larger fires and fires out in the open will very much be affected by the wind, but otherwise will take on a more haphazard form – though the base of the fire will always be wider than its tips. There will likely be smoke, sparks, and ashes flying around as well, but don’t worry about that for now.
With all that said, let’s start by doing a quick sketch using diluted watercolour paint! For fire, I prefer using watercolour instead of pencil, as the pencil lines will disrupt the fire’s formlessness.
From there, start with yellow, and paint the area around the flame and at its base. It’s ok to let the yellow bleed into the candle as well – the flame’s colour will tint the edges of the nearest objects.
Next, mix in some red with your yellow for a bright orange, and drop it around the flame as well. Leave a sliver of yellow for a gradated effect! Though hopefully, your paper is still damp at this point so the colours can blend more smoothly.
Use this orange to paint the candle as well, though you can fill in the rest of the candle. The lightest colours will always be the areas nearest the flame, so again you can try for a gradated effect on the candle. Make sure to leave some lighter highlights along the edges as well!
Do the same thing with your red paint, again leaving some orange areas to create that ombre effect. You can paint a bigger area around the flame this time, just to mark out how much of a glow you want to have.
The shape of the glow should also follow the shape of the flame, though it will be wider and more rounded in the area around the thickest part of the flame.
Also, before the red areas dry, mix in blue with your red for a darker purple, and use this as your background colour. If you find that the paint has already dried, try wetting the edges of your red paint before painting next to it.
As you get further away from the flame, keep adding more blue paint while avoiding the candle itself. You want to “cut” around the candle to create the contrast I was talking about earlier (i.e. the “negative painting” technique).
Bonus tip: You can add this shadow colour to the candle if you want its base to eventually fade into the background. Just keep the highlights around its edges – it will add to the glowing effect!
Finishing Touches

You can keep layering more paint in the background to create those shadows. Alternatively, if you have objects in the background, remember to preserve your highlights (a.k.a. glowing edges)!
They get progressively darker the further away they are from the light source, but there should still be a little definition for these edges. Just make sure these highlighted edges are facing the flame.
Another detail to take note of is that despite being next to the light source, the wick is black since it’s burnt. Any dripping wax will also have a shadow underneath, so make sure to include those if you see them.
The colour of the candle will also affect how much of the flame’s colour it will take – so a white candle will adopt the same colours, while a black candle will be almost invisible.
Tip: If you accidentally paint the white part of the fire, you can use white gouache paint to cover these parts. But it only works once, so do this at the very end! Sparks and embers can be done in yellow gouache paint, or if you’re careful enough, can be done with the negative painting technique.
We Have Ignition

These are the basic principles of fire, and how to create that “glow”. It does get more complex as you add more surrounding objects, so the best advice I can offer is to take or find good reference photos, and to study them well.
There will be a lot of negative painting, glazing, and layering, but as long as you have the core elements down, you can always build on them and find ways to make them work for you.
And of course, an artist’s preferred style will influence the aesthetic of anything they paint, so it could go more cartoony, or illustrative, or realistic, and people will still be able to tell that it’s a fire from the glow produced.
This is just the tip of the iceberg (or flame!), so what are you waiting for? Let those sparks fly!
Do you find it difficult to paint the elements? What about objects that produce their light source?
Do you have any tricks you use yourself that haven’t been mentioned above? Let us know in the comments below!
2 comments
Love the effects great article
Very interresting