Gouache is a unique type of opaque paint, as it is water-soluble and super quick- drying. Traditional gouache even reactivates like watercolour when you add more water to it after it’s dry!
If you already paint with watercolours, you have the supplies necessary to start using gouache too, and if you already paint with acrylics then some of the gouache’s properties will be familiar to you.
It’s not quite so simple as a watercolour/ acrylic hybrid though, so before we get to the meat of this tutorial, here are a few things to remember about gouache’s properties.
-
Gouache can be applied watered-down and transparent, but that isn’t the best look for it, so if you want to lighten a colour, simply add white rather than making the paint more transparent. Think of this like acrylics, because yes you can apply acrylic paint in watered-down washes but that’s more for a first layer and not for the finished product. Here's a quick overview of watercolour vs. gouache vs. acrylic.
-
Since gouache reactivates when it’s rewet, the correct way to layer it is to put thicker paint on top of thinner paint and not the other way around. If the layer above is more watery than the layer below, it will rewet the surface and mess up both layers. Also, don’t paint over a spot too many times if you don’t want to pull up the colour underneath. There are gouache varieties that don’t reactivate, so if that’s the kind you have you won’t need to worry about any of this.
-
Gouache doesn’t reactivate to the same degree that watercolour does, so rewet paint on your palette from the day before will not be as nice to use as fresh paint. I wash my palette often to keep fresh paint on it.
-
You will want to keep your brush wet when using gouache. If the paint is too dry it will feel like you’re painting with chalk and that’s not a fun feeling. The paint won’t blend very well.
-
Light gouache colours dry darker than they appear wet, and dark colours dry lighter than they appear wet. You may need to paint with higher contrast colours than you think you’ll need.
Now, with that out of the way, it’s time to paint a winter landscape! Gouache is popular for landscape painting so that’s a good place to start.
I took the warmer blue in my gouache set and mixed it with violet. This produced a blue that is a bit subdued due to the warm/cool mixture, but still vibrant enough to make a pretty sky.
I added some of the coolest red in the set to create the pink part of the sky and lightened it all to the correct shade with white. Those are the only colours I used in the whole painting.

Blending gouache is rather similar to blending acrylic. Use horizontal brushstrokes to smooth the transition while the paint is still wet.
Start with the darker part of the sky at the bottom where it will meet the trees, then go lighter and purpler as you go up, then the plan is to darken it again somewhat at the top. This is going to be the eastern half of the sky at sunset.

It’s okay if the gradient is a little messy if the gradient is too perfect then it won’t look like a sky because a sky has little clouds usually.

Keep smoothing out the transition, adding more of each colour and rewetting the brush as necessary. It might take several layers but don’t lose heart. You’re learning!

Now, lighten the same colours you used for the sky and add the first indication of the snowy ground. It should be the coolest in the background and warmest in the foreground.
There are going to be trees and a road so don’t worry about everything touching yet.

Take some burnt sienna and mute it with the winter colours you already mixed. You’ll need to add a lot of the cool tones probably because it’s so warm out of the tube.
Put it in places where the snow will have melted off the road, no need to be too precise just yet.

Add snow colours to the road and blend it over the brown to make it look like there’s ice over some of the gravel at the edges of the snow patches.
Again, since you can layer gouache there’s no need to be too precise just now.

Stop worrying about the road for now and rough in some trees, mixing the coolest green into the cooled down brown and working in layers.
My initial brown tree layer was too brown so I had to go back with green and fix it.
Adding black was also necessary for me to get the right tint at this stage, but remember that usually adding black from a tube of paint is a mistake.

Make the trees in the distance darker and cooler than the trees in the foreground. Atmospheric perspective makes things in the distance appear more cool-tinted.

Add a bit of texture by going back and forth with the different shades of brown in your palette, and don’t be afraid if it starts to be a little messy because you can layer over it gently. The foreground trees should have a few lighter spots.

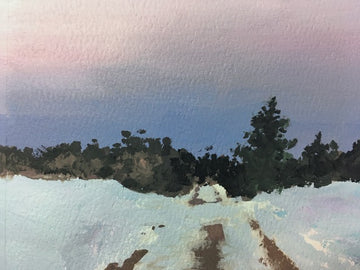
This is what we have so far. Don’t worry if your painting is a little rough looking because we haven’t added highlights yet and the highlights add life.

Highlight with slightly purply white on the edges of the snowbanks where the snow is in chunks from being ploughed while frozen hard.
Use the same white mixture to add a full moon if you like; my reference didn’t have a moon but with some practice, you’ll know what would fit your painting’s lighting scheme even if it’s not in the reference.
All the best painters change their reference slightly to make it their own.
And that is a brief introduction to gouache! If you are frustrated, don’t give up. Gouache has a surprisingly steep learning curve but if you nurture your skill like a garden it will grow.
Want a deep dive into the medium? Check out our Introduction to Gouache course!
4 comments
I had given up on using the few tubes I have, but you have explained it so well, I may try again.
———
Etchr Lab replied:
Thank you so much! We’re glad you’re willing to try out gouache again! ❤️
Loved the way you went about it. I’m pretty acquainted with acrilics and realize they have a lot in common. Just as a curiosity I must say you’ve reached me in Brazil. Be good.
———
Etchr Lab replied:
Glad you enjoyed reading it, Orlando! We hope you get a chance to explore gouache too 🖌️
Thanks. Sounds fascinating but not courageous enough to try yet
———
Etchr Lab replied:
You’ll never get to 100 steps unless you take the 1st! 😁 We’re sure you can do it, Lindy! ❤️
Thanks! I’m going to give it another go.