If you’re browsing this website, you are almost certainly a fan of watercolour.
The free-flowing yet subtle washes of colour add character and life to any picture. And if you’ve been drawing for any length of time, you’re familiar by now with graphite as a versatile and convenient medium.
Water-soluble graphite brings the smoothness of watercolour to the world of graphite, for exciting effects and a shortcut to shading pictures.
In this article, I’m going to show you how to get started with water-soluble graphite in the Etchr hot press watercolour sketchbook.
When trying any new art medium, the best way to begin is to make a
swatch chart and experiment with different mark-making techniques.
If it’s a wet medium, it’s always important to check and see how water affects the result.
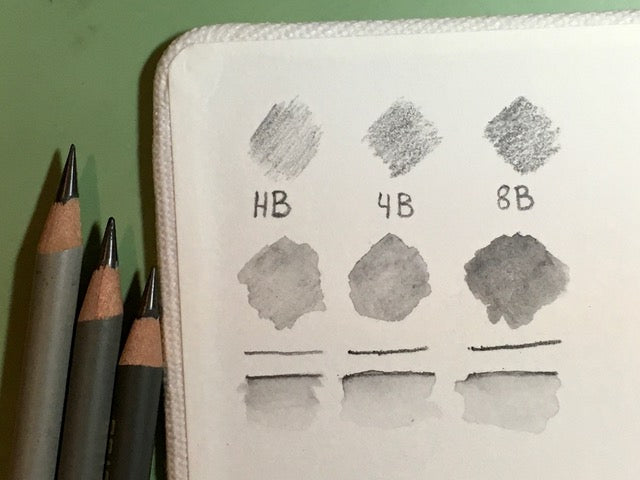
My set of water-soluble graphite pencils came with an HB, a 4B, and an 8B, so I began my chart with a dry swatch of each one to see the difference in lead texture.
As you can see, the leads were all rather nice and creamy and got progressively darker and softer.
Below each dry swatch, I made identical swatches but then put a wash of water over them. The graphite texture gave way to a slightly granulated watercolour appearance, and the shade grew darker and richer!
My final test was a sort of blend test. First I made a straight line of all three leads to leaving alone as a comparison group, then repeated the three lines but then tried to form them into gradients using only water.
The HB, being the lightest, was the easiest to get a smooth transition to white with.
The lines stayed fairly intact, which is a good thing because one of the enticing things about water-soluble graphite is the idea that wetting the lines of a drawing could be all it takes to shade if the brushstrokes are well-placed.

The next step to successfully trying a new medium is to use what you learned in your swatch experiments to render a form. I’ve chosen the sphere.
Lightly map out the shadows without pressing too hard on the pencil for this step. Layer the graphite a bit but not too much, because wetting the surface will darken the shade.

Softly add water and don’t go over the same area too many times or else the shade will be blotchy.
As the deepest shadows grow darker in the water, don’t be afraid to push some of the tinted water towards the lighter parts of the sphere to draw out the highlight areas more.
Just make sure to never over-darken an area, because this stuff is less erasable than regular pencils. Add more layers of graphite and water over already- dried areas if you wish to deepen the shades further.

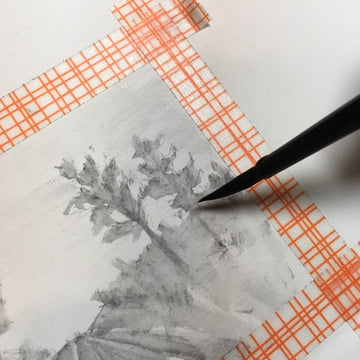
Now that you’ve done some fundamental exercises to learn the feel of water-soluble graphite, it’s time to draw something for real! I’ve taped off a portion of the page to get clean edges around my picture, but if you prefer a more rugged look that works too.
Establish the basic value relationships with the dry graphite but don’t overdo it since it will, of course, get darker with water.

Add a layer of water and place it discerningly so that the value doesn’t become the same across the picture.
Also, mind the edges of objects, and experiment with different brushstrokes and think about the effect those have on the edges of objects.
I was not very precise with this drawing because of how tiny it was, but you can be very precise if you like.

To get the drawing to this final place, I repeatedly layered more dry graphite over the picture after the water dried, then put water on that too.
I regret not drawing this at a larger scale (it’s only about three inches wide!) to experiment with more texture variety and precision, but even at this tiny scale, it was easy to add some texture at least.
Try to finish with a pencil layer instead of a water layer so that the texture of the final details can pop. This can add some easy atmospheric perspective and give your work some distinction.
Water-soluble graphite is also available in a tin as a powder, so if you enjoy using the pencils then the powder is probably a good thing to try also.
This medium is great for saving time and having some flexibility while still getting that lovely watercolour effect, and hot-press paper really maximizes the texture contrasts between the dry and wet pencil marks.
4 comments
Hi Daniel! What a fantastic question, thanks so much for bringing it up! Once the graphite is dry, you can only erase a little bit to lighten areas- no major erasing. Also, water-soluble graphite will not smudge or come off on your finger after it is dry.
Greetings!
Thank you so much for sharing your knowledge 🙏,
can we use eraser after putting water on it, is it erasable?
Hello, Elsa – This is a lovely introductory demo re water soluble graphite pencils. I’m brand new to Art and have jumped into watercolor, where WS graphite would be very helpful. Can you tell me what brand pencils you used here? How did they compare to other brands you may have used? If you prefer not to comment publicly, please feel free to respond to me via email. Thanks so much! -AO
Okay, you inticed me! Just ordered water soluble graphite tin and bought a few Faber Castell pencils at my local Art store. Excited to try, Thank you.